To prevent a water leak claim rejection, you must proactively build a case that counters the insurer’s three main arguments: gradual damage, poor maintenance, and underinsurance.
- Your policy covers “sudden and accidental” events, not slow leaks from worn-out sealant.
- Proving you undertook regular maintenance (with photos) is your best defence.
- Insuring your home for less than its true rebuild cost can proportionally slash your payout, even on a small leak claim.
Recommendation: Start thinking like a loss assessor: document everything, understand the policy’s fine print, and get your rebuild cost professionally assessed before you ever need to claim.
That dark, spreading stain on the ceiling. The damp patch behind the skirting board. Discovering a water leak is a heart-sinking moment for any homeowner. The immediate advice is always the same: turn off the water, call a plumber, and notify your insurer. While correct, this advice misses the most crucial part of the process: how to navigate the claim itself to ensure you’re not rejected on a technicality. Many valid claims are denied or significantly reduced because homeowners unwittingly fall foul of the insurer’s playbook on exclusions.
This isn’t about simply filling out a form; it’s about strategically presenting your case. The key isn’t just to show the damage, but to prove the event was “sudden and accidental” and that you’ve fulfilled your duty of care to maintain the property. Insurers are not in the business of paying for problems caused by wear and tear or neglect, and they have specific clauses, like those for gradual seepage or the dreaded “Condition of Average,” designed to protect them.
But what if you could pre-empt these rejection tactics? The true secret to a successful claim lies in understanding the insurer’s mindset and building an evidence-based case they cannot reasonably refuse. This guide will walk you through the critical distinctions, preventative measures, and documentation strategies that loss assessors use to win claims. We will move beyond the basics to explore how to prove your case, from documenting maintenance to correctly calculating your home’s value, ensuring you receive the full settlement you are entitled to.
This article provides a comprehensive overview of the key factors that determine the success of a water damage claim. The following sections break down the most common pitfalls and provide actionable strategies to protect your property and your financial interests.
Summary: Navigating Your Water Leak Insurance Claim
- Why You Need ‘Trace and Access’ Cover to Find the Leak Source?
- How to Prevent Burst Pipes During a UK Winter Freeze?
- Sudden Burst vs Gradual Seepage: Which One Does Insurance Cover?
- The Grout and Sealant Clause That Kills Bathroom Claims
- When to Turn Off Your Stopcock: A Guide for Holiday Absences
- Why Undervaluing Your Rebuild Cost Cuts Your Claim by 50%?
- How to Monitor Wall Cracks Before Calling the Insurer?
- Buildings Insurance: How to Calculate Rebuild Cost Correctly?
Why You Need ‘Trace and Access’ Cover to Find the Leak Source?
Before the damage from a leak can be repaired (the ‘access’ and ‘rectification’), the source must first be found (the ‘trace’). This sounds simple, but a hidden leak from a pipe under a concrete floor or behind a tiled wall can require specialist equipment and significant investigative work. This process is known as Trace and Access, and it is a distinct part of your insurance cover. It pays for the cost of finding the leak—which can involve breaking through walls, floors, or ceilings—but not the cost of repairing the pipe itself.
Many homeowners are surprised to learn that a standard policy might cover the resulting water damage but not the thousands of pounds it costs to locate the source. Fortunately, the UK market has evolved, and now most policies include this cover as standard. According to Defaqto data, 97% of UK buildings insurance policies include trace and access, typically with a limit of between £5,000 and £10,000. This is crucial because without it, you could be left with a huge bill just for finding the problem, even before any repairs begin.
However, you cannot simply hire a specialist and send the bill to your insurer. You must get pre-authorisation for the work. Acting without the insurer’s consent is a fast track to having that part of your claim rejected. Always report the leak first, explain that the source is not obvious, and formally request approval for trace and access work. Your insurer may have a list of approved specialists they prefer you to use, so clarifying this from the outset is essential for a smooth process.
How to Prevent Burst Pipes During a UK Winter Freeze?
The most common cause of “escape of water” claims in the UK is the winter freeze. When water in an unprotected pipe freezes, it expands, putting immense pressure on the pipe. When the thaw comes, the split pipe releases a torrent of water, causing catastrophic damage. Insurers expect you to take reasonable steps to prevent this. Failing to do so can be interpreted as negligence, potentially giving them grounds to reject your claim. Prevention is your first and best line of defence.
The primary defence is insulation. Any water pipes in unheated areas of your home are at risk. This includes pipes in the loft, garage, or utility rooms, and those running along external walls. Wrapping them in proper foam pipe lagging is a simple, cheap, and incredibly effective measure. It’s not just about the pipes you can see; consider the entire plumbing system, including outdoor taps, which should be fitted with an insulating cover after being drained.
Beyond insulation, maintaining a minimum ambient temperature is vital. Many modern boilers have a frost protection setting that fires up the heating if the temperature drops close to freezing. If you’re going away during winter, it’s far better to leave the heating on a low, constant setting (around 14°C) than to turn it off completely. This small running cost is insignificant compared to the potential cost and devastation of a burst pipe. Finally, ensure you know where your main stopcock is and that it works, allowing you to shut off the water supply quickly in an emergency.
Sudden Burst vs Gradual Seepage: Which One Does Insurance Cover?
This is the single most important distinction in water damage claims and the number one reason for rejection. Home insurance is designed to cover sudden and accidental events. A pipe that bursts overnight or a washing machine hose that fails without warning falls squarely into this category. The damage is unexpected and happens over a short period. Conversely, insurance is not a maintenance contract. It will not pay for damage that occurs slowly over weeks, months, or years due to wear and tear, lack of maintenance, or faulty workmanship.
This is what insurers term gradual damage. A classic example is a slow leak from a shower seal that has degraded over time, allowing water to seep into the wall or floor below. By the time you notice the damage, it has been occurring for a long while. From the insurer’s perspective, this was a preventable issue that regular maintenance (e.g., resealing the shower) would have solved. As an expert from Restore-It Water Damage Restoration notes, this principle is central to how policies work.
Insurance is designed to protect you from sudden, unexpected events. It is not meant to pay for problems that happen slowly due to wear and tear.
– Restore-It Water Damage Restoration, Sudden vs. Gradual Water Damage Insurance Guide
The burden of proof is on you, the policyholder, to demonstrate the damage was sudden. This can create grey areas. A corroded copper pipe that finally gives way could be argued as both a gradual process (corrosion) and a sudden event (the final failure). In these cases, evidence from a plumber or leak detection specialist can be crucial in classifying the event in your favour.
This table illustrates how insurers typically classify common water damage scenarios, showing why some claims are paid while others are swiftly rejected.
| Scenario | Classification | Insurance Coverage | Key Reasoning |
|---|---|---|---|
| Failed washing machine hose | Sudden & Accidental | Covered | Unexpected equipment failure, no prior warning signs |
| Burst pipe due to freezing | Sudden & Accidental | Covered (if preventative measures taken) | Sudden event, provided adequate heating was maintained |
| Slowly failing shower grout allowing seepage | Gradual Deterioration | Rejected | Maintenance issue, damage occurred over time |
| Plastic pipe connector under sink suddenly fails | Sudden & Accidental | Covered | Unexpected failure of plumbing component |
| Corroded copper pipe finally gives way | Grey Area | May be challenged | Could argue sudden failure vs. gradual corrosion – requires evidence |
| Slow leak from bathroom sealant over months | Gradual Deterioration | Rejected | Considered preventable through regular maintenance |
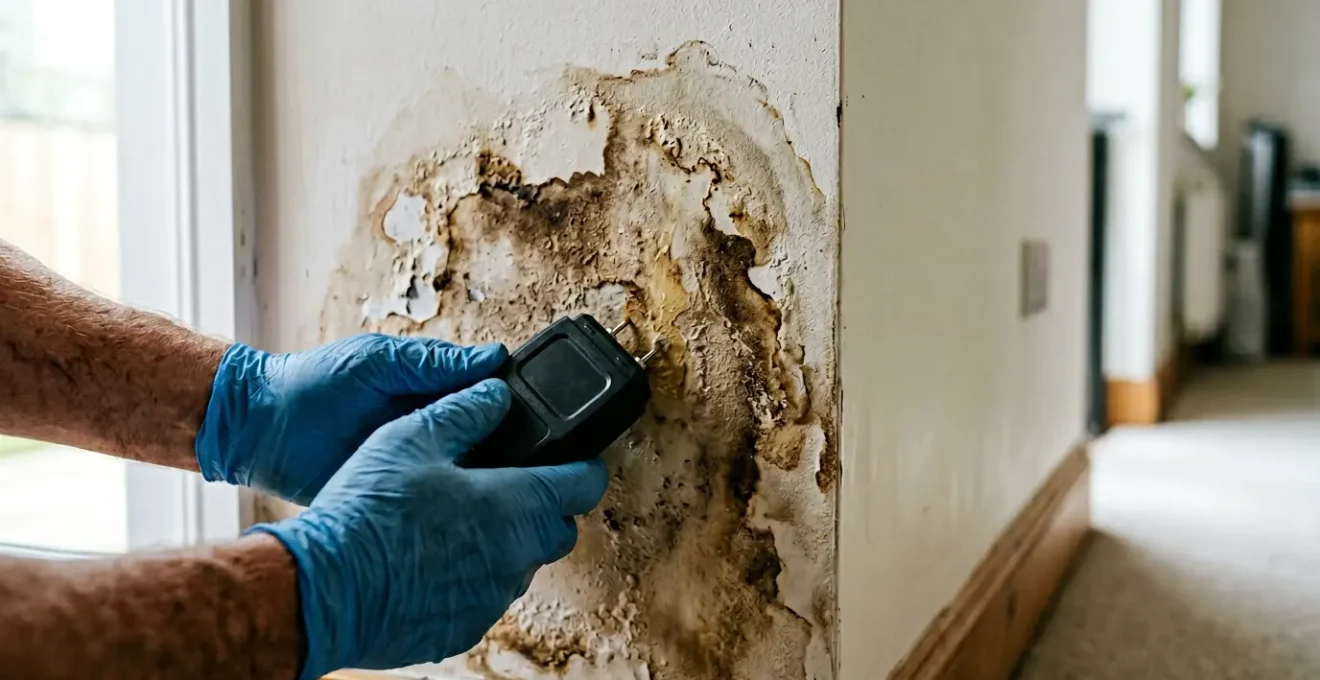
The Grout and Sealant Clause That Kills Bathroom Claims
Nowhere is the “sudden vs. gradual” battle fought more fiercely than with bathroom leaks. Claims for damage originating from showers and baths are notoriously difficult because they so often fall into the “gradual damage” trap. Insurers will immediately look for evidence of failed grout or degraded silicone sealant around a shower tray or bath, arguing that the leak is a maintenance issue, not an insurable event. They will state that you, the homeowner, failed in your duty to keep these seals in good condition, leading to a slow, long-term leak.
So how do you fight this? The key is proactive documentation. You need to build a body of evidence that proves you take maintenance seriously. If your claim is rejected for “gradual deterioration,” being able to provide proof of regular upkeep can force the insurer to reconsider. As one case study showed, a homeowner whose claim was initially rejected was able to get the decision overturned by providing a plumber’s report and, crucially, photographic evidence of annual sealant inspections. This transformed the argument from “You neglected your bathroom” to “Despite our client’s diligent maintenance, an unexpected failure occurred.”
This is a strategy any homeowner can adopt. Creating a simple, dated, photographic log of your bathroom’s condition is an incredibly powerful tool. It costs nothing but a few minutes of your time each year and can be the deciding factor in getting a claim worth thousands of pounds paid. It shifts the narrative and demonstrates your commitment to maintaining the property, making it much harder for an insurer to argue neglect.
Your Action Plan: Creating a Bathroom Maintenance Log
- Identify Key Points: Once a year, identify every seal in your wet rooms—silicone around the bath, shower tray, and sink, plus all major grout lines. These are your inspection points.
- Gather Evidence: Take clear, high-resolution photos of these points. Use your phone with timestamps enabled to create a dated record of their condition.
- Establish a Baseline: Store these photos in a dedicated, dated cloud folder (e.g., “Bathroom MOT Jan 2025”). This becomes your proof of the state of maintenance at a specific time.
- Document Repairs: If you re-apply sealant or re-grout an area, take “before” and “after” photos and keep the receipts for materials. This demonstrates active maintenance.
- Build Your Case File: In the event of a leak, this folder is not just a collection of photos; it’s your primary evidence to counter an automatic “gradual damage” rejection from the insurer.
When to Turn Off Your Stopcock: A Guide for Holiday Absences
Leaving your home unoccupied for an extended period, such as a holiday, increases the risk of a major water leak going undetected. A small drip can turn into a catastrophic flood if no one is around to spot it or turn off the water. Insurers are aware of this, and your policy will have an “unoccupancy clause,” typically kicking in after 30 or 60 consecutive days. If you’re away for longer than this period without informing your insurer, your cover could be voided. For shorter trips, you still have a duty to take reasonable precautions.
The ultimate protection is to turn off the water supply at the main stopcock and drain the system. The stopcock is usually located under the kitchen sink or where the water pipe enters your property. Turning it off isolates your home from the mains water supply. After closing the stopcock, open all the taps to drain the water remaining in the pipes. This completely removes the risk of a leak from the pressurised system. However, this may not be practical if you have a modern combination boiler that requires water pressure to function, especially if you need the heating on for frost protection.
The alternative is to leave the water on but ensure your heating is set to a constant low temperature (e.g., 14°C) to prevent pipes from freezing in winter. Many modern smart home systems now include smart water valves that can automatically shut off the water supply if they detect a continuous flow, indicating a leak. While these are an excellent investment, insurers will still expect you to have followed the basic precautions. The most important thing is to read your policy documents and understand what your insurer requires of you when the property is left empty.
Key takeaways
- Sudden vs. Gradual is Everything: Your claim’s success hinges on proving the leak was an unexpected event, not a result of long-term wear and tear.
- Proactive Documentation is Your Shield: A simple, dated photo log of maintenance on seals and grout can defeat the most common reason for rejection.
- The Underinsurance Trap is Real: Failing to correctly value your home’s rebuild cost can proportionally slash any claim payout, turning a £10,000 leak into a £5,000 settlement.
Why Undervaluing Your Rebuild Cost Cuts Your Claim by 50%?
This is a devastating financial trap that catches out countless homeowners. You might think that a £10,000 water leak claim has nothing to do with the total rebuild cost of your house, but you would be wrong. Buried in the small print of every home insurance policy is the “Condition of Average” clause. This clause states that if you insure your home for less than its true rebuild value, you are considered to be co-insuring the risk with the insurance company. In the event of any claim—no matter how small—the insurer will only pay out proportionally.
Let’s look at a real-world scenario. A homeowner has a house with a true rebuild cost of £400,000. To save on their premium, they only insure it for £200,000—that’s 50% of its real value. A pipe bursts, causing £10,000 of valid, covered damage. The homeowner submits the claim, expecting £10,000 (minus their excess). However, the insurer applies the Condition of Average. Because the property was underinsured by 50%, the insurer will only pay 50% of the claim. The homeowner receives just £5,000.
Case Study: The Condition of Average in Action
A UK homeowner with a property requiring a £400,000 rebuild cost only insured their home for £200,000 (50% of its actual value). When they filed a £10,000 escape of water claim for ceiling damage, the insurer applied the ‘condition of average’ clause. Despite the claim being fully valid and covered, the insurer only paid £5,000 (50% of the claim) because the property was underinsured by 50%. This demonstrates how undervaluing rebuild cost penalises even small, unrelated claims proportionally.
This is a brutal lesson in the importance of accurate valuation. Escape of water is a frequent and expensive peril; according to data from the Association of British Insurers, £1.8 million is paid out every day for escape of water damage. By underinsuring your property, you are exposing yourself to shouldering a significant portion of any claim you make, for any type of damage.
How to Monitor Wall Cracks Before Calling the Insurer?
While often associated with subsidence, wall cracks can also be an early indicator of water-related issues, such as a slow leak causing foundation soil to wash away or heave. However, not all cracks are a sign of disaster. Buildings naturally settle over time, leading to benign hairline cracks. Calling your insurer prematurely about normal settlement can be a mistake, potentially leading to a logged incident that increases your future premiums. The key is to monitor, measure, and document before you make the call.
The first step is to differentiate between benign settlement and potentially serious structural movement. Diagonal cracks, often wider at the top than the bottom and appearing in a stair-step pattern through brickwork, are a classic sign of subsidence. Thin, vertical cracks, especially around door frames or at the junction of walls and ceilings, are more likely to be simple settlement or plaster cracks. Before panicking, start a monitoring diary. Place a ruler or coin next to the crack for scale and take a clear, high-resolution photo. Mark the ends of the crack with a pencil and write the date.
Repeat this process monthly. This will give you an objective record of whether the crack is static or actively growing. If the crack is stable over a period of 6-12 months, it is likely non-structural. If it is actively widening or lengthening, you have concrete evidence to present to your insurer. This systematic approach transforms you from a worried homeowner into a credible reporter, providing the data needed for an engineer to make a proper assessment.
The table below provides a quick guide to help you distinguish between typical settlement cracks and those that may indicate a more serious issue like subsidence.
| Characteristic | Benign Settlement Cracks | Concerning Subsidence Cracks |
|---|---|---|
| Direction | Thin, vertical, often near corners | Diagonal, typically at 45-degree angle |
| Width | Hairline to 1-2mm | Wider than 3mm, often widening at top |
| Location | Around door/window frames, ceiling corners | Through brickwork, extending outside |
| Pattern | Random, non-progressive | Stair-step pattern in brickwork |
| Timing | Appear shortly after construction/renovation | Appear after prolonged dry weather or near trees |
| Action Required | Monitor for 6-12 months, fill if stable | Report to insurer immediately, professional survey needed |
Buildings Insurance: How to Calculate Rebuild Cost Correctly?
As we’ve seen, getting your rebuild cost wrong can be financially crippling due to the Condition of Average. It’s vital to understand that the rebuild cost is not the market value of your home. The market value includes the price of the land, which would still be there after a fire or flood. The rebuild cost is the price of demolishing what’s left of your home and rebuilding it from scratch to its original specification. This figure includes labour, materials, professional fees, and site clearance.
With construction costs constantly changing, how can a homeowner arrive at an accurate figure? There are three main approaches. The first is a DIY method using the free online rebuild calculator provided by the Association of British Insurers (ABI). This gives a reasonable ballpark figure based on your home’s age, style, and location. For most standard properties, this is a good starting point and is far better than guessing. The average claim for burst pipe damage is estimated to be over £10,000, and ensuring your total cover is correct protects this smaller claim.
For more accuracy, or for a non-standard home, you should invest in a professional valuation. A desktop valuation from a Royal Institution of Chartered Surveyors (RICS) surveyor can provide a more tailored figure without a site visit. The gold standard, especially for unique, listed, or high-value properties, is a full on-site RICS valuation. The cost of this survey is a small price to pay for the peace of mind of knowing you are fully insured. Remember, this is not a one-time calculation. You should review the rebuild cost annually and update your insurer after any major improvements, like an extension, that would increase the cost of rebuilding.
Ultimately, a successful insurance claim is not a matter of luck; it is the result of foresight and preparation. By understanding the insurer’s playbook—their focus on sudden events, their intolerance for poor maintenance, and the punitive nature of the average clause—you can take control. Document your home’s upkeep, get a professional rebuild valuation, and know your policy’s terms. When you treat your insurance not as a safety net but as a legal contract that requires your active participation, you transform yourself from a potential victim of circumstance into a prepared partner in the agreement, ready to secure the settlement you deserve.